


Open Source Software is a type of software that has its code released for the public under a license, meaning that you are free to see their code.
Open Source Coding has become very popular in our programming world. You can learn lots of new stuff, collaborate in teams, improve coding practices, make new connections, join a lot of communities, work on your soft skills, and improve codes of projects ranging from those that belong to a few people to those of tech giants.
Contributing to Open Source should always be done in a systematic way and by following the proper rules to avoid confusion and bring out the maximum efficiency of the team.
Many newcomers being confused about how exactly they should contribute to the project after choosing one. With the coming of a lot of Open Source events in the future like MLH Fellowship, Hacktoberfest, GirlScript Summer of Code (GSSOC), Google Summer of Code(GSOC), Outreachy and many more... it came to me that it will be a good idea to list down the steps to follow so that anyone can contribute to almost any Open Source projects.
Note: For this blog, I assume you have basic knowledge about Git and GitHub.
1. Join the project's community/chat group.
If there is a project/organization which you are interested in, they would most probably have a group to stay in contact on any of the good team management platforms, like Slack, Discord, Zulip, etc.
Do make sure to join them so that you can always stay up-to-date and in contact with the people who own the projects. You can also ask any kind of doubts that you have regarding the code there. Project owners and Organization members are always happy to help out. So be sure to ask them all your queries.
2. Fork and clone the project's repository
GitHub is the most popular platform for online storage and a distributed version control of your code through Git. So the first step is to fork the project. This is done because you cannot edit their code directly. If that was allowed, it would cause risky issues, where the whole project might crash because of someone's small mistake.
That's why you fork the project to create a personal copy of the project on your GitHub ID which you can work upon. Then go ahead and clone the fork to your local system. You will find the fork button near the top right corner of the repository's GitHub page.

Then go ahead and clone the project into your desired folder!
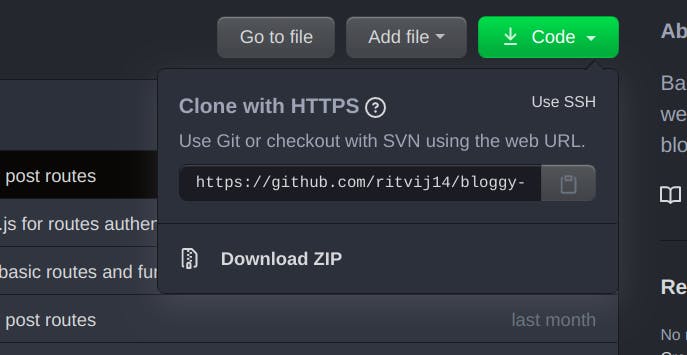
Use the link shown above like this inside the folder where you want to store your local copy and then move into it-
$ git clone https://github.com/ritvij14/example-project.git
$ cd example-project
3. Setting a remote to the main repository
To keep your local copy of the code up-to-date with the main repository, we set a remote. In git, a remote is a link that connects your local copy to the repository online.
When you clone the project, you have one remote created automatically, which is named as origin. This remote connects your local copy to its online version that's there on GitHub.
You can see your remotes using this command:-
$ git remote -v
origin    https://github.com/ritvij14/example-project.git (fetch)
origin    https://github.com/ritvij14/example-project.git (push)
This shows your forked copy of the repository to which it is directly linked, and this is where you push your updated code.
Now we add a new remote for the main repository. Use this command:
$ git remote add upstream https://github.com/org-name/example-project.git
upstream is the name we give to the new remote. This is just conventional though, you can name it anything you want. But usually, in teams, people talk refer to it as upstream only. Now you can try this to see the new output of the new remote being set.
$ git remote -v
origin    https://github.com/ritvij14/pmt-backend.git (fetch)
origin    https://github.com/ritvij14/pmt-backend.git (push)
upstream    https://github.com/Devsoc-BPGC/pmt-backend.git (fetch)
upstream    https://github.com/Devsoc-BPGC/pmt-backend.git (push)
Warning Do not try pushing to the upstream repository. Since you won't be given the necessary GitHub permission by the project managers, it will only cause errors. Even if they do, don't push since that can cause problems in the main repository. We only use upstream for pulling the latest updates to the code.
4. Select an issue to solve
On the main repository's webpage, there will be an Issues tab, which will take you to the Issues section which lists down all the issues that need to be fixed for the project. Issues can range from minor grammatical changes in documentations, to as big as introducing a completely new feature. Most of the well organized open source projects have issues with different kinds of labels so you come to know what things need to be changed just from the headings.
The organization members will help you out to get a good issue and explain to you what needs to be done, and then you can have a look at the code where you need to make changes.
Once you have decided, you can comment on that issue and someone who is managing that particular project will Assign it to you.
Tip
For newcomers, it's best to choose issues with the label good first issue. These are issues made specifically for newcomers to solve so that they can get used to the code while solving them. These are the easiest issues, so do solve them! ;)
5. Let the coding begin!! :D
Now that you have got an issue to solve and know what to do, it's coding time :)
For any project, it is a good practice to not directly work on the master branch. For writing the code, it is advisable to work on a separate branch for making the changes so that your master branch's code stays safe and you can use that to see how the project functions before your changes.
So make a new branch in your fork and also your local copy and start writing the necessary stuff in it.
$ git checkout -b fix-for-bug
This creates a new branch in git and switches you into it. Now you can write the code for solving the issue in this new branch. Once you are done solving the issue and are satisfied with your work, it's time to prepare it for sending it to the main repository!
6. Commit your code
Yeah, I know this is a fairly simple task, right? Just 2 commands and you are done!
$ git add .
$ git commit -m "Issue solved"
But we need to make sure of a few things first, before pushing it.
First thing is that the commit message should explain what you have done. Neither too short nor too long, in most cases, just a single line explanation of the task you did is enough for the project owners. But sometimes they might have their own rules on what the commit message should look like, so make sure you follow them properly.
The second thing to make sure is, to keep your code up-to-date. For this we pull any latest code from the upstream remote we set earlier into our new branch.
$ git pull upstream master
This will update all your files with any code additions or deletions. It is a good habit to pull from upstream whenever you start working on a new issue. In addition to that, you can also make it a habit to check code each day to be sure that your local copy is in sync with the upstream.
Merge Conflicts
Sometimes you might face conflicting changes called merge conflicts, mostly when something is changed in the file you are already working in. GitHub docs explain it well as to how to tackle this problem. Along with this, in my opinion, it's would also be good to check out some of the last merged commits in the main repository to have a look at the changes in your files.
6. Pushing the code.
Once everything is done and tested, your code is ready to be sent to the main repository! :D Firstly push the code:
$ git push origin fix-for-bug
Make sure it's the new branch as that should be the one you use for sending the Pull Request.
7. Send Pull request
 After pushing, you can go to the main repository page --> Pull Requests tab --> New Pull Request
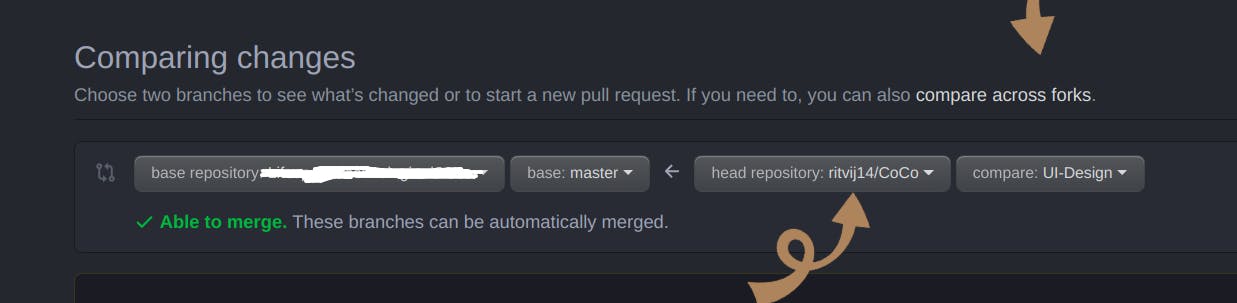
From here you select the compare across forks option and then look for the fork with your GitHub username. On choosing that and the branch you push your code in, you automatically see your commits and files you have changed. After verifying everything once again, click on Create New Pull Request button. That will take you to the part where you type in a message for your PR (Pull Request).
Writing the message.
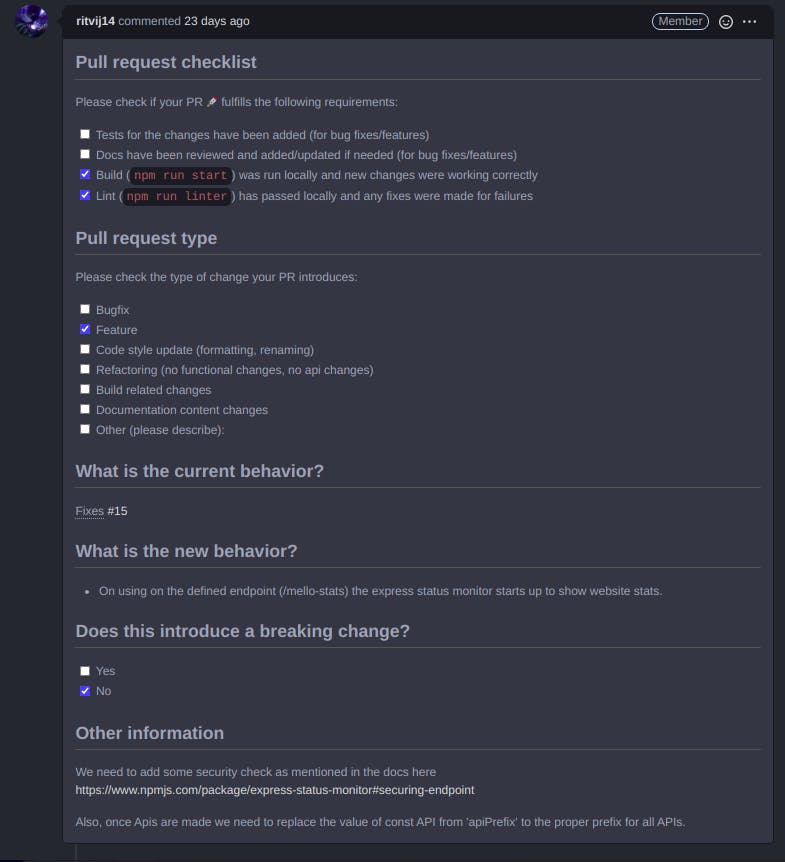
This is an important part since the message of the PR is the main way for the project owners to know what you have done. Mostly you are given a template by the Project owners themselves, which appears by itself when you start making the PR. All you need to do is type in the precise but complete info of what you have done, including explanations with pictures if asked, checking checkboxes to tell the tasks done, and also use "#" to link the issue it solves using the issue ID. Here is an example template for a PR where I filled the necessary info.
Once done, send the PR and HURRAY! You are done with your contribution to the project! Now sit back and relax with a cup of coffee and wait for the project owners to review your PR and merge the code. You can even start looking for the next issue if you want ;)
8. Next steps...
Many times the project owners may want you to make some changes after you send the PR. Doing changes is simple, all you need to do is make the changes asked, commit them, and push them again. The new code with the changes will appear directly on the sent PR!
Squashing commits into one
A really important thing which might come in handy is git rebase. Using this you can squash multiple commits into one. Many times, when by mistake you get the job done in too many commits, the project owners might ask you to squash them all into one commit. This can be done by git rebase
Have a look at this Medium post which explains how to do it.
Well, that covers up on how to make contributions to open source projects. I hope this post will help out a lot of Open Source Enthusiasts in beginning their Open Source journey!
Happy coding!
P.S.: I am taking part in the Contributor's Hack 2020, by HakinCodes. So now I have decided to document my experiences from such events. I hope to become a better content writer by writing on a daily basis!